Hey, how’s it going this is Shawn Daniel with Guitar Control, today we’re going to learn an Acoustic composition rendition version of Jefferson Airplane “White Rabbit”.
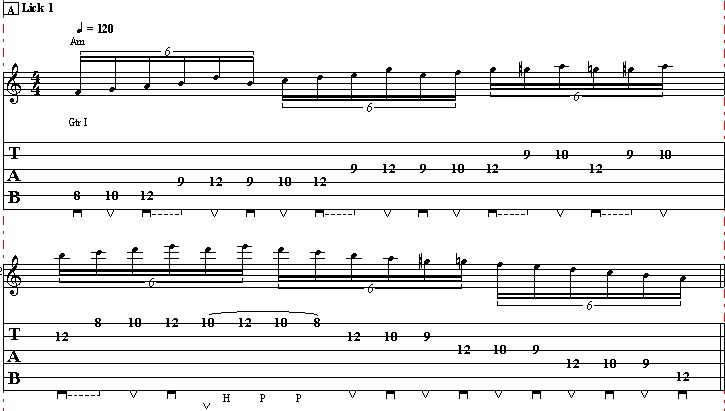
Click on the Tabs button to follow the chords and tabs.
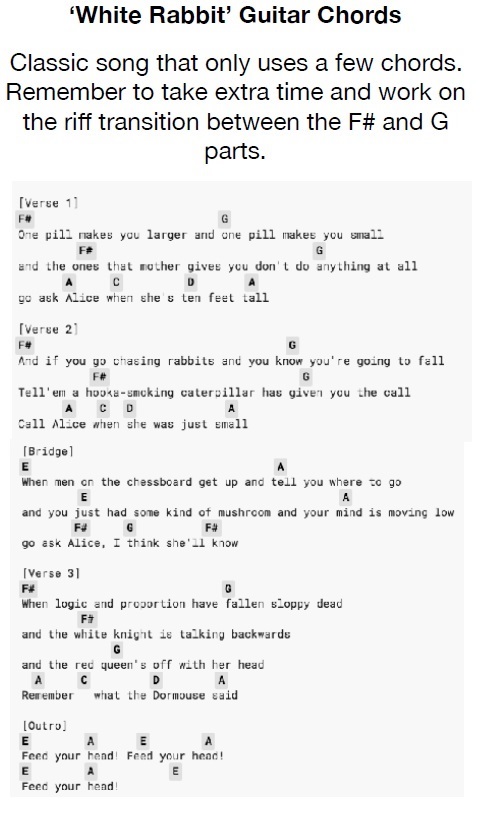
It’s more about trying to make an acoustic version that tries to capture a lot of, what that amazing band and that amazing singer had going on that you can kind of accompany yourself or someone else. So it’s kind of speeding over a couple different parts but really fun one to play with a really great riff that starts on this F sharp. Once you hear that, it’s so recognizable whether it’s an acoustic guitar whatever kind of representation you want to do.
We’re going to jump into this chord and you can even make it a power chord if you want, 2nd fret on the E-string, 4th fret on the A-string, but I think it sounds cool having this 2E, 4A, 4D, 3G, and then open B, and opening, sliding back and forth between the 2nd and the 3rd fret. That one fret little jump even if it’s as powerful as recognizable as to that song no matter how you end up playing it. I think the strumming is kind of important to really come to get to the gravity of that that minor at that half step switch going on between an F sharp and a G.
You’ll notice that I’m taking my pointer finger and moving it on and off to kind of get a little more of that glue that is making this acoustic version a little more together and that kind of poppy short burst staccato, what really makes that rhythm almost military in a certain, kind of like an unstoppable rhythm thing.
That all comes from a lot of left hand or fretting hand technique works. I try to get that instead of going all sustained. The way to do that is you just hit that 1st fret, you strike it with your pick or your finger whatever you do and then take the pressure off almost like pressing taking a button right you do the same thing over chords, again there’s a lot of different variations in strumming patterns you can get but we’re just going for kind of an approximation of what that band is doing it and that kind of unstoppable nature that makes an awesome song.
After this, we’re looking at this as an F sharp to a G, and then we’re going to an A. So this is an A to C to a D. Now I’m still using these barre chord versions you could totally go hey like that right would be open chords. I personally like this way because I kind of feel it has more power to it, than that’s of a rock and roll type thing instead.
Though this is an acoustic version we still want to keep a lot of guts, a lot of power from it. However if you want to do it again, I’m not here to judge I’m just kind of showing you do it. A again, I’m still in this open thing with a B and the E-string are open and then I’m doing an A-string rooted bar chords on that 3rd fret and 5th fret again there’s a difference between C to D, where everything sounds really good versus 3A, 5D, 5G, to 5 to 7 to 7, again all these little things kind of great to know because they add up and allows you to manipulate the song and even more if you want to make an even more stripped-down part of this octave.
We start on the low C and then the higher one 3A. I get a lot of the point these lessons are to be able to make somewhat dynamic acoustic arrangements of these songs which I think is really helpful if you’re playing by yourself and singing or accompanying other person to get what that band approximation and pay tribute to the to the rock and roll gods.
We have the riff from the half sharp to the G give some of those flourishes in there or maybe think what that drummer is doing to an A, to C, D, back to A, now it’ll goes back to the riff we’re just going to go to an E major to an A major part.
That is an E shape open A, if we move this way down to the 7th fret it’s how I’m seeing it, you’re A barre chord to be right there, we’re getting openness to it something I think it sounds pretty good. Back into the riff it’s just A to C to D and then back and forth between the E major and the A major part of it.
This song really gains a lot of energy as it goes along a lot because they’ve got one of the nastiest singers of all time that really starts talking to low and then ends with an explosion of singing talent, ability of something that I think you can do to create a little bit of that atmosphere is by aggressively palm muting the early parts. It’s still got that kind of daunting unstoppable feel but it’s so far down and again I’m not doing anything differently I’m just taking the side of my hand chopping that bridge to get all the sustain out of it and then start letting back and walk it back to the beginning.
A little bit of less muting and then as you go along you can hit it a little harder, remembering that dynamic by the time you get to the A bar and for the other part you’ll going to hammer-on and hold the pressure into your hand and having that kind of a dynamic control. I think it’s important if you’re doing an acoustic versions of really big songs, something that’ll be just really good for your musicianship and instead focus a little bit on the techniques going on with your strumming hand and how they relate to your fretting hand going forward, kind of a straightforward song that is analyze in this riff. There’s one fret apart riff however you decide to play it and then A, C, D, A part and then back and forth from E to A,
Awesome song, I think everybody should try their hand at its really a great song to practice .Make sure to subscribe on our YouTube Channel and we’ll see you in our next video lessons, thanks for watching.
[ninja-popup ID=715]