How to Play No More Mr. Nice Guy on Guitar
In this video I am going to explain how to Play No More Mr. Nice Guy on guitar by Alice Cooper. This song is so fun and is definitely more challenging than you’d think. There are tons of cool chord alterations and chord voicings that give these riffs their classic unique sound and make this song stand out. I had a lot of fun creating this lesson for you guys and hope you have a lot of fun learning how to play it and pushing yourself. In this lesson I am going to cover a couple of the main stand out riffs and a cool lick.
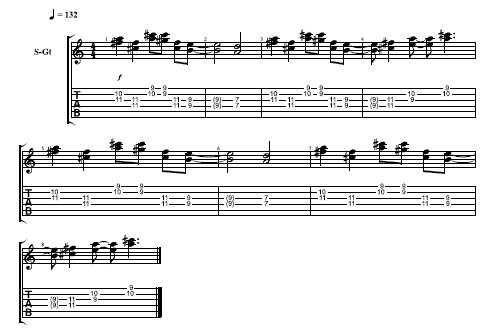
Step 1: The Intro Riff
Step one in learning how to play No More Mr. Nice Guy on guitar is learning the intro riff. So let’s go over it! This riff is super cool, the coolest thing about it is it kind of plays off of the same position. So where we put down our fingers, really matters for this riff. I start off by putting my pointer down on the 7th fret 4th string, I make a power chord with my ring finger, putting it down on the 9th fret 3rd string and then I’m including that octave note with my pinky, holding it down on the 2nd string 10th fret. I strum all of these strings I have put my fingers on, including the open 5th string, so strum from the 5th string all the way through the 2nd string for this chord. I strum this chord twice.
Then I am going to go ahead and place my middle finger on the 8th fret 2nd string and pick up my pinky, I do this simultaneously. I strum this chord one time only. Then I just pick up my ring finger, so now my pointer is still on the 7th fret 4th string and also holding down the 7th fret 3rd string while my middle fingers is still holding down the 8th fret 2nd string. I strum this chord twice, stopping the strings from ringing out in between each hit. So this riff is simple in the sense that we are not moving out of position but it’s hard because you have to get those fingers placed and moved accordingly. To get the mute in between the two hits I place my palm down making the riff sound really clean.
Step 2: The Fill
For the fill I have an open 3rd string, then I go ahead and slide on the 4th string 7th fret to 9th with my ring finger. Then I drop my pointer down to the 3rd string, it’s already kind of hovering over it because we used our 3rd finger in the part before. So then I pick the 7th fret 3rd string once, and then I pull off. A pull off is when we have a finger placed behind the note we are about to pick so that when we pull off to it that is the note we will hear and we do this with only one attack with our pick. So on the 3rd string 9th fret pull off to the 7th fret pull off to zero. If you enjoyed this fill be sure to check out my other lesson, how to play Crosstown Traffic by Jimi Hendrix, for another great song with a similar pull off lick.
Step 3: The Chorus
The next part we are going to cover is the chorus! And it kind of sings along with the chorus which is really cool. We are just using two notes at a time, which is called a double stop, it can also just kind of sound like a higher voicing of a power chord and totally gives that classic sound a lot of riffs from this time period have.
For the first shape I placed my middle finger down on the 2nd string 10th fret, then I placed my ring finger on the 3rd string 11th fret and I only pick these two strings together. Next I am only going to hold down the 3rd and 4th string both on the 11th fret using my ring finger, just kind of shifting it up from the 3rd string only to know hold down both the 4th and 3rd strings at the same time pushing it down and barring. Barring is when we use one finger to hold down more than one note. So so for we went from the 3rd and 2nd string to the 4th and 3rd string but also changing frets. Moving from the 10th and 11 fret to only the 11th. We will play this chorus through twice.
Everything we have done so far is the same in both, only the endings will be different. Kind of similar to that first shape I am now using my 1st finger on the 9th fret 1st string and my middle finger on the 2nd string 10th fret. Then the next shape I am barring both the 2nd and 1st string with my pointer on the 9th fret. Then I am going to go back to the 4th and 3rd string 11th fret and strum both strings together with my 3rd finger, then use my pointer on the same strings but moved over to the 9th fret. Then I wait and move them both down on the same strings to the 7th fret. This is the first half of the chorus, we are going to alternate between these two different halves, they just have different endings.
The second time through on the second ending, because it’s almost all the same. Instead of going to the 7th fret on the 4th and 3rd strings after you play the 9th fret 4th and 3rd strings, you are going to go back to the 11th fret 4th and 3rd strings barring with your 3rd finger. Then I put my pointer on the 3rd string 9th fret and my middle finger on the 2nd string 10th fret. Then I just drop my pointer to the 1srt string 9th fret and I leave my middle finger on the 10th fret 2nd string. And that is the last voicing! So alternating between these endings.
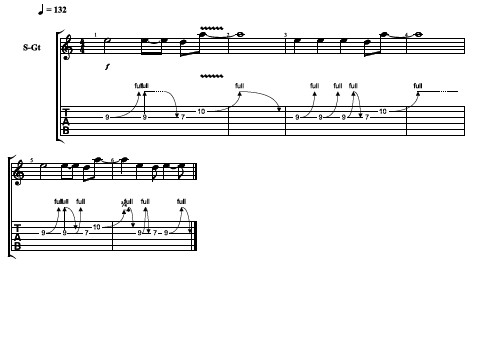
Step 4: The Lick
So now for the last part we are going to go over. The lead in the intro. So this lead is pretty simple, a lot of bends with just a couple variations. The first bend is the 3rd string 9th fret. So the first bend and all the bends in this solo are whole step bends. If you don’t know how to bend a whole step, remember you can check the pitch you are trying to bend to by moving up two frets from the note you are bending and just picking that note to hear the pitch you are bending to.
For example, in this song you are bending the 3rd string 9th fret first, so to check your bend you would pick the 3rd string 11th fret, hear that note and then bend the 3rd string 9th fret till it matches this note. So back to the lick. The first bend is just up, so the 9th fret 3rd string bend up a half step, the second bend we are still bending the 9th fret 3rd string but now both up and back down. Then pull off to the 7th fret 3tf string, followed by one more bend on the 10th fret 2nd string, one full step. So to check that one, pick two steps higher, picking the 12th fret 2nd string. Picking this note only to hear the pitch we were trying to bend to.
The second time through is very similar. This time though we bend the 9th fret 3rd string up twice. These two bends only go up, not up and down. Then bend the 9th fret 3rd string both up and down into the same pull off as before, to the 7th fret 3rd string. So this time through the lick is different because we did two bends up before the up and the down into the pull off, the first time through we only did one up.
And now for the last part of this lead. This time through is very similar to the first time through except with a little different ending at the tail. It doesn’t hang out a long time at the end like the first one, but the beginning is the same. So first, bending the 3rd string 9th fret up once, then bending it again but this time both up and down straight into the pull off and then right back into another full step bend on the 9th fret 3rd string. Then right back to the 3rd string string 9th fret, bend both up and down into a pull off to the 3rd string 7th fret and end with a bend going only up on the 9th fret 3rd string.
Recap: How to Play No More Mr. Nice Guy on Guitar
I hope you enjoyed learning how to play No More Mr. Nice Guy on guitar. This song is so fun to play. There are so many cool parts that make it a stand-out riff, from the intro to the chorus to the leads. Remember to pay attention to finger placement and to work on controlling your bends for the leads. Play slow to play fast, and of course, as always, have fun!