How To Play Barracuda on Guitar
In this Guitar Control video lesson, I’m going to show you how to play “Barracuda on Guitar”, by Legendary Sisters, Heart. This song is awesome and has a really cool grove. It also covers some interesting lead guitar techniques that make this Intro stand out. I’m going to focus on the Intro and that Killer Rhythm, I’ll break it down, explain what the rhythm is, the techniques, and of course, how to play it.
Step 1: How to Imitate a whammy Bar with a Fixed Bridge Guitar
What makes this riff really cool and special is the Gallop rhythm we have going on and the harmonics. Since I don’t have a whammy bar what I did to emulate the harmonics is I pushed the body of my guitar towards my body and I pushed the head stock away, one with one hand, and one with the other at the same time. It creates a dip in the pitch like we hear when we use a whammy bar.
Step 2: Breaking Down the Gallop Rhythm
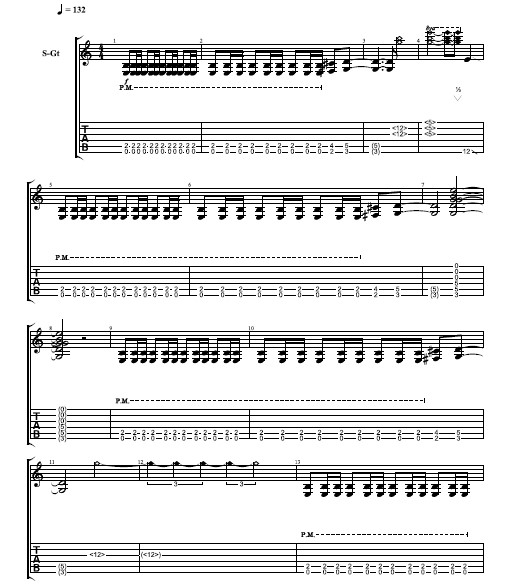
The first step in actually learning how to play “Barracuda on Guitar” is to breakdown and fully understand the rhythm. This driving rhythm is a huge part of this song, it creates the mood and gives this riff tons of attitude.
To start this rhythm we have one eighth note and two sixteenth notes. If you aren’t familiar with breaking down or reading rhythms, this song and most commonly songs are in a time signature called 4/4 or common time… since it’s so commonly used. The first four represents how many beats are in one measure of the piece of music. The second number tells you what kind of beat equals one, so in 4/4 that means we have 4 beats in each measure and a quarter note equals one beat.
Now, that we know this, breaking this rhythm down will be a lot easier. So Barracuda starts with an eight note and two sixteenth notes. An eighth note gets half of one beat, and a sixteenth note gets a quarter of one beat. When adding all of these together, we only have one complete beat out of the four we need. To clap or play a rhythm like this helps, instead of counting 1,2,3,4 and dividing it up that way, counting 1 e & a, 2 e & a, 3 e & a, 4 e & a.
This way we now visually see each single beat divided smaller, making it easier to play these quicker rhythms. So back to beat one, the eighth note would last for the count “1” and “e” since it gets half of the whole first beat. The sixteenth notes would fall on the “&” and the next one of the “a” making one full beat! To strum this rhythm, I go down, down, up the entire rhythm but repeated over and over. So same thing on beat 2,3,4 etc. Heart repeats this rhythm for almost two full measures, it is repeated for all of measure one and the first 3 beats of measure two. On beat 4 of the second measure, I play an F#5 power chord and a G5 power chord. Each chord lasting for one eighth note.
When dealing with eighth notes you can just count 1 &, 2 &, 3 &, 4 &, but in this case just for beat 4 of the second measure. So the F# 5 is played on beat 4 and the G5 on the & of 4. For our first repeated rhythm the chord I was using is an open E5 power chord. That is our main chord for this song. To play an open E5 place your pointer finger on the 5th string 2nd fret and strum only the open 6th string and the 5th string. So strumming both the 6th and 5th strings to get that E5 power chord.
Unlike the open E5, when we play the F#5 and the G5 we use two fingers. So for the F#5 place your pointer on the 6th string 2nd fret and your ring finger on the 5th string 4th fret, it’s optional to include your pinky on the 4th string 4th fret because its the octave. Which means it’s the same note we are holding down with our pointer but in a higher register, it sounds nice to use, but it isn’t necessary because your pointer already is playing this note.
Power chords are awesome because it’s one shape to know all the chords, unlike open chords where they all look very different. You can mess around and move this shape all over the neck and even write some of your own riffs. As long as you know your notes on the 6th and 5th strings you can quickly figure out how to play a power chord version of a chord for any note you wish. To play the G5 just move the entire shape up one half step, so one fret. Now our pointer is on the 6th string 3rd fret, ring finger on the 5th string 5th fret and your pinky which is optional on the 4th string 6th fret. If you enjoyed breaking down this rhythm be sure to check out our other video, How to Play Immigrant Song by Led Zeppelin, for another in depth breakdown of a strong rhythm.
Step 3: The Fills
Now, for the fills! For three out of our four fills we are using harmonics. Harmonics are really cool, this is a technique I haven’t explained in any of my videos so far, but it’s an awesome one to add extra flare or an extra touch to a riff. What we are doing is we’re just placing our finger over the fret, we want to hear and we’re not pressing down but we are picking. I put my finger over the side closest to me in that box that we want. It creates this high pitched, dreamy sound. The best places to play them are usually frets 3,5,7,9, and 12, so over the frets that have dots in them, and on the side of the fret closest to your picking hand and away from the head stock.
So before fill one, we of course have the same rhythm we just went over, that is going to be the rhythm for all of these. The fills come in after the F#5 to G5 chords and this particular fill starts with harmonics on the 3rd and 2nd strings, both on the 12th fret and played at the same time. So in one picking motion, strum only the 3rd and 2nd strings while your ring finger plays a harmonic on the 12th fret. Then I put my pointer over the 3rd, 2nd, and 1st strings on the 5th fret and play these harmonica, in one picking motion but on this one we bend the neck own to emulate the whammy bar so the pitch sounds like it dips and then comes back to normal.
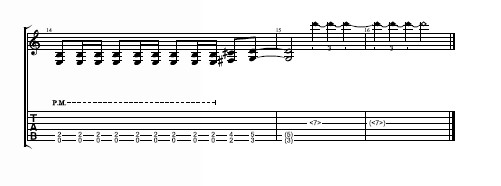
Fill two is very simple. All we’re doing is when we get to the G5 we then strum all the remaining open strings under it and let it ring out. This is a separate strum from the one that happens right after the F#5 that is part of the riff. This is our easiest fill since all we are doing is strumming our same power chord all the way down. I am including the octave note with my pinky, but everything else is open.
Fill three is just a harmonic on the 12th fret 3rd string. So remember to place your finger just over the fret. Frets are usually referred to as the “boxes” on the guitar neck, but remember the actual fret is the piece of metal, and when I’m saying to place your finger over the fret I’m talking about the side closest to you, on the 12th fret. So we place if over and just pick, at the same time you pick you lift your finger off the fret and let the harmonic sustain and ring out. Then push the guitar neck away from you and the body towards you to create that whammy effect without the whammy bar and to add style. And that’s fill 3! Very simple, just pick that harmonic on the 12th fret 3rd string and pick and push that harmonic to get the whammy bar effect. If you have a whammy bar just use that of course!
Fill four is also very simple. Go to the 3rd string 7th fret and do the same thing that we did for fill 3. Pick the harmonic and let it ring out while pushing the body of the guitar towards yourself and the neck away from yourself. Just a really clean and clear harmonic, placing our finger over the fret, picking and then picking our finger back up off the string almost instantly, making it sustain for a long time, the same exact thing we did on the 12h fret 3rd string in fill 3.
Recap: How to Play Barracuda on Guitar
I hope you enjoyed learning how to play “Barracuda on Guitar”! This song is so fun and full of interesting special touches that make it unique and stand out. Make sure to spend time syncing your hands and learning how to master the harmonics. Also, be sure to pay lots of attention to detail while learning the main rhythm and be able to pick apart the different note qualities used. Practice slow to play fast and of course, as always, have fun!
Click Here to Learn More