How to Play Shout It Out Loud on Guitar
In this Guitar Control Lesson, Instructor Robert Baker is going to show you how to play Shout It Out Loud on guitar by KISS. What a classic! This song is in Eb tuning, so everything is down a half step from the standard tuning where the 6th string is E, the 5th is A, the 4th is D, the 3rd is G, the 2nd is B, and the 1st is E. Robert is staying in standard for this lesson, so you probably will also want to stay in standard, but if you are going to play along with the recording you would simply tune all your strings down one half step. Meaning the 6th string would become Eb, the 5th string would become Ab, the 4th string would become Db, the 3rd Gb, the 2nd Bb, and the 1st would become Eb.
In this lesson, Robert will cover it all, the twin guitar part in the beginning, the main riffs, and the solo. We are going to walk through all of these riffs focusing more on Paul Stanley parts through a lot of it, but then we are going to do the solo, which of course is Ace Frehley.
Step 1: Harmony Solo
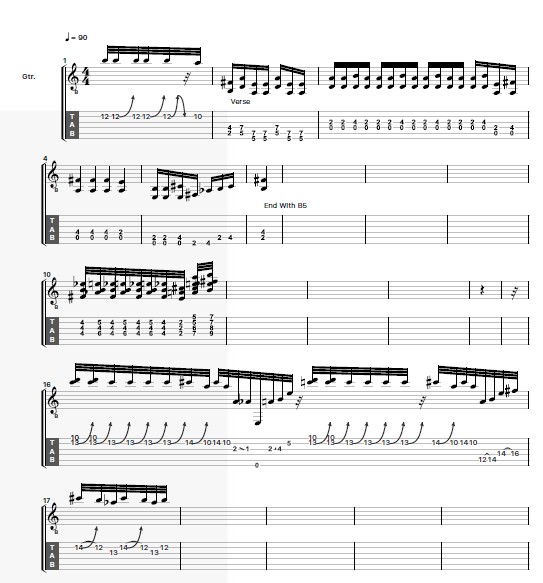
Step one to learning how to play Shout It Out Loud on guitar is to learn this main harmony solo that’s going on. Like I said we are only going to do one of the harmonies. So start on the 12th fret 2nd string and bend it up one full step, then bring it back down, bend it up again, and then bend it again both up and down and pull off to the 10th fret 2nd string.
Step 2: The Verse
For the next part we are going to go to a B5 power chord. Robert is playing the B5 by placing is pointer finger on the 5th string 2nd fret and his pinky finger on the 4th string 4th fret and strumming only those two strings, the 5th and 4th strings and let that chord ring out. You can also play the B5 on the 6th string 7th fret root, but Robert is using the 5th string 2nd fret root for this lesson. After the B5 you are going to go to D5, so just simply move up 3 frets on the same strings.
So now your pointer finger is on the 5th string 5th fret, and your pinky on the 4th string 7th fret, strumming only the 5th and 4th strings and just strum it once. Then you are going to go to an A5, which is just directly above. So move each finger up one string. Now your pointer finger is on the 6th string 5th fret and your pinky is on the 5th string 7th fret, again only strumming the strings that your fingers are holding down frets on, so the 6th and 5th strings now and play this chord twice. Then repeat the part where you play the D5 once and the A5 twice.
A quick recap, play B5 once, then go to D5 once, then to A5 twice, back to D5 once, back to A5 twice. Then repeat all of that! For another awesome classic song, check out our lesson how to play Stormbringer by Deep Purple.
Step 3: The Shuffle Riff With a Little Twist
This part is basically your standard shuffle riff, but they add a little bit of a twist to it. Starting with an open 4th string, and pointer holding down the 2nd fret on the 3rd string, so play those together at the same time twice, this is an open D5 power chord. Then to get that shuffle you are going to use your ring finger to grab that 4th fret 3rd string, play that one, then back to the open D5 three times, then back to the shuffle with your ring finger down on the 4th fret 3rd string.
During the shuffle we always play the open 4th string, whether our ringer is on the 3rd string 2nd fret or the 4th fret. Then repeat this going back and forth playing the open D5 three times and placing your ring finger down on the 4th fret 3rd string and strumming once to get that shuffle. Then go to an A5, which is an open 5th string with your pointer holding down the 4th string 2nd fret, and of course, strumming these two strings together at the same time. Play it once. Then switch the note you’re holding down on the 5th string from the 2nd fret to the 4th getting that shuffle note in. Then back to the open A5 three times, to the shuffle.
Then you suddenly move up another string, now playing the open E5. So now an open 6th string with your pointer finger holding down the 5th string 2nd fret. Strum this chord twice, only strumming the 6th and 5th strings, then grab that shuffle note, the 5th string 4th fret and strum it once with the open E on top, Then hammer on the 2nd fret to the 4th fret on the 6th string, and then hammer on the 2nd fret to the 4th fret on the 5th string. And that is the whole verse part! This riff with the riff from step 1 are both considered the verse and played back to back. Then it does that part again, and if you listen to the song, there are some slight variations, like the one Robert shows at 4:06 where you don’t go to the 6th string you just go the B5 and let it ring out, which takes us into the main riff.
Step 4: The Main Riff
The main riff starts with a barre. On the 5th fret use your pointer to barre the 4th string through the 2nd, so the 4th, 3rd, and 2nd strings all under your pointer finger. Then keep your barre but also place your middle finger down on the 5th fret and your ring finger on the 6th fret, making an E chord. So this riff is going B to E, B to E. So they keep bouncing between these two chords while following the vocal, “Shout it, shout it, shout it, out…” Then on the word loud, you move your barre from the 5th fret to the 3rd. So ending by barring the 3rd fret, 4th, 3rd, and 2nd strings all with your pointer and just playing that chord once. Then Paul does this little part where he makes an A major by placing his ring finger on the 7th fret 4th string, his middle finger on the 6th fret 3rd string, and his pointer barring the 5th fret on the 2nd and 1st strings. Pick it once and then slide it up two frets to a B and then pick it again on the B chord. For the B chord your ring finger is now on the 9th fret 4th string, your middle finger on the 8th fret 3rd string, and his pointer barring the 7th fret on the 2nd and 1st strings. That last little part that Paul does is almost like a fill or turn around to go back and repeat all the stuff before it, following the vocal, the B, E, B, E, B, E, B, A.
Step 5: The Solo
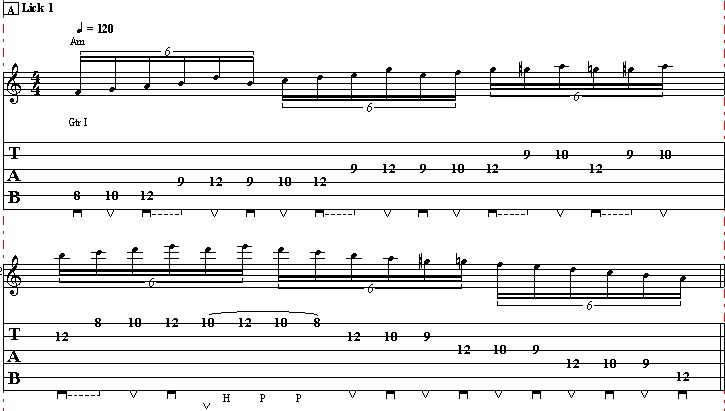
The solo starts off with a unison bend on the 13th fret 2nd strings and the 10th fret 1st string, bend the 13th fret and pick both the 2nd and 1st strings with your fingers on the frets we just said. Pick that unison bend twice, Then on the 13th fret 2nd string you are going to do these kind of stutter bends, he does four of them.
Then next part you can tell his guitar is doubled, but of course we are only playing one. Bend the 14th fret 2nd string up and down, then to the 2nd string 10th fret, back tot eh 14th fret, back to the 10th fret, all on the 2nd string. Then do this little run, use your pointer to play the 2nd fret 3rd string and slide down to the 1st fret, also on the 3rd string, then an open 6th string. Then 2nd fret slide up to the 4th fret on the 3rd string. And then grab the 5th fret 2nd string with your middle finger. Everything else was all your pointer finger. This is pretty loose so they could be hitting a bunch of open string, feel free to have fun with this one. After that lick go back to the unison bend on the 13th fret 2nd string and the 10th fret 1st string. Then on the 5th string hammer on the 12th fret to the 14th fret, then on the 4th string hammer on the 14th fret to the 16th fret. Then you have this little repeating lick that starts by bending the 14th fret 2nd string, bend it both up and down then pulling it off to the 12th fret, then to the 13th fret 3rd string, then back to 12 fret 2nd string and then do it again. And that’s the whole solo!
Recap: How to Play Shout It Out Loud on Guitar
I hope you enjoyed learning how to play Shout It Out Loud on guitar by KISS! What a fun song. From the first verse to the catchy chorus, to the awesome solo! This is a great song to learn if you feel like you’re kind of in a playing slump. It’s just such a fun, good spirited song with tons of cool riffs and licks and you will just have a lot of fun learning and playing this one. So be sure to pay attention to all the details, play everything slow first and master any tricky changes before speeding it up, and of course, as always, have fun!