How to play Play That Funky Music
In this Guitar Control video lesson instructor Robert Baker, is going to teach you how to play “Play That Funky Music” by Wild Cherry. This is a really fun song and impossible to not nod your head to. There are all kinds of good stuff in this lesson. There are two guitar parts in this one but today Robert is going to focus on the main guitar part. The main guitar part is the riff you hear and any of really recognizable parts to this song. Not that you shouldn’t learn it all, but that is going to be the focus of today’s lesson. Not only is Robert going to focus on the main parts of this song, but also the awesome solo in this song.
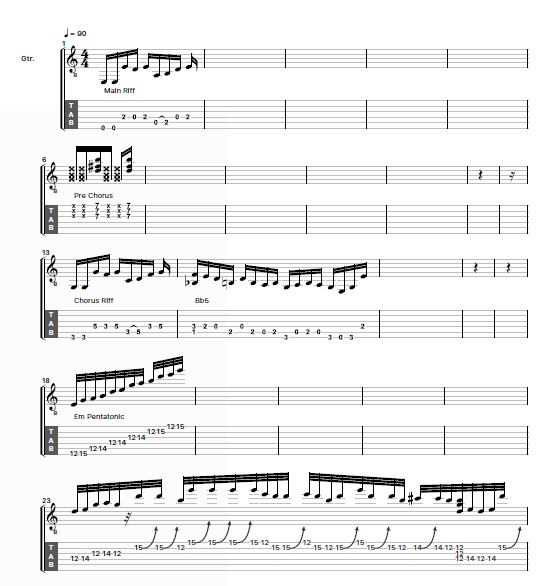
Step 1: The Main Riff In the Open Position
Step one to learning how to play “Play That Funky Music” is diving into this opening riff. There are two different ways to play this riff, the way Robert prefers to play it and is going to show you how to play it is by using the open strings. He prefers the open position because it has a little more pop and twang to it. To start off the entire riff, Robert slight mutes the 6th string and picks it open twice. Then he picks the 2nd fret 4th string, to the open 4th string, back to the 2nd fret 4th string. He picks each of those notes individually. Then he goes to the 5th string and does a hammer on from the open 5th string to the 2nd fret 5th string.
A hammer-on is just what it sounds like it is, you pick once and then slap your fretting hand finger down to the next note hammering it on and making the next note ring out without needed its own pick attack. Then back to the 4th string where you are going to pick the open string and then also pick the 4th string 2nd fret. A lot of people do a hammer on there but if you listen to the song closely you can tell he’s picking that note.
The hardest part about this song is the groove, anytime you are dealing with funk music it is all about the groove. It might not be the most complicated lick, but the actual rhythm and timing is what is going to be the tough part. The other guitar part that we are not covering in this lesson really shows that. If you are loving that funk sound but having a hard time mastering it, be sure to check out Robert’s other video lesson for beginners showing how to play funk guitar. This main riff is the riff people really recognize from this song.
To add some detail to this riff, Robert mutes the lower strings but not the higher strings. This adds a lot of depth and dynamics to this awesome riff. One thing he does to give this track a little extra funk, pop to it, is that he is actually doing quite a few upstrokes. What happens when you add in these upstrokes is that you kind of going underneath the string and kind of pop it, giving this riff a lot more emphasis on that twang sound.
Step 2: The Main Riff in the 5th Position
The main riff in the 5th position which really just means the 5th fret, still starts out with the open 6th string picked twice and muted. Then all on the 5th string, you are going to go 7th fret with your ring finger to the 5th fret with your pointer, back to the 7th fret with your ring finger. Then go to the 6th string and pick the 5th fret and hammer it onto the 7th fret. Then pick the 5th fret to the 7th fret on the 5th string. Sam exact notes, but these different positions have a slightly different feel to them. Position 5 you are using all fretted notes, and in the open position you are using lots of open notes which just automatically gives a looser feel. Again Robert prefers the open position but it is totally up to you. This is the verse of the song and we also refered to it as the main riff because it is the riff that reminds you of this song and the most recognizable riff in this song. They keep playing this riff and the bass kinda just holds down that groove.
Step 2: The Bridge
To play this bridge section there is some left hand muting going on. Robert made a point to include this because the other guitar kind of cuts out here and it’s just getting us into that funky style of playing. With your pointer finger, barre the 7th fret 3rd, 2nd, and 1st frets. So putting pressure on the 7th fret, 3rd string through the 1st. You can do the full chord if you want but we are just gonna focus on the mute for right now. So the trick is that you have to mute three times, so you want to have your hands where they’re not touching the strings where you are going to mute with your fretting hand. So mute with your picking hand and go down up and then down but now letting the chord sound out. When Robert does this he aims for the highers strings, it gives you more of that “chick chick” sound. Cycle this a bunch. Two mutes and a chord.
The next part starts with the 3rd fret 6th string twice with your pointer, then pick the 5th fret to the 3rd fret back to the 5th fret all on the 4th string using your pointer to ring fingers. Then hammer-on with your pointer to ring finger, the 3rd fret to the 5th fret on the 5th string, and then pick the 3rd fret to the 5th fret on the 4th string. Same as that 1st riff but just now it’s kind of out of G. Cycle it and then go to Bb5. Pointer on the 1st fret 5th string, ring finger on the 3rd fret 4th string and pinky right under on the 3rd fret 3rd string, strum it once and then go right into the walkdown! The walkdown is all out of the E minor pentatonic scale which Robert will cover more in the solo.
Start with your pointer finger on the 4th string 2nd fret, pick it once and then pick the 4th string open. Then go to the 2nd fret 5th string, then back to the open 4th string. Then back to the 5th string picking the 2nd fret to open again. Back to the 2nd fret on the 5th string, to the 3rd fret 6th string. Then pick the 5th string open to 2nd fret, open 5th string again, 3rd fret 6th string, to the open 6th string, back to the 3rd fret 6th string, ending with the 2nd fret 4th string. This actually just follows that famous vocal line, “Lay down the boogie and play that funky music till you die”
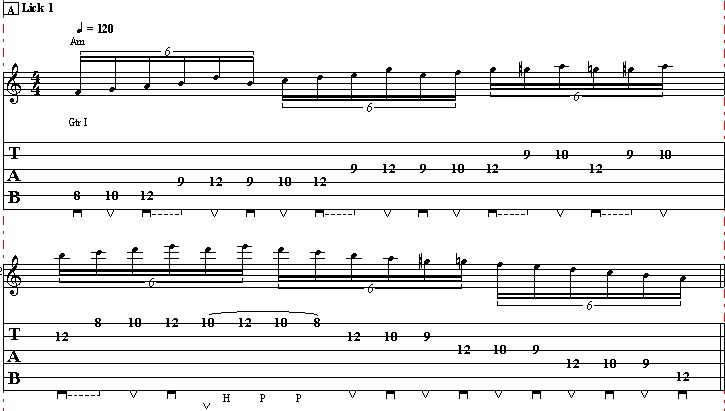
Step 3: The Solo Scales
Now for the Solo! The solo is almost entirely out of box 1 of E minor pentatonic, but it does venture into box 2 for a second. If you already know these scales you can skip through this part, to follow along while Robert shows them to you though see the video at the 7 minute mark.
Box 1 E minor start with the 6th string pointer on the 12th fret and pinky on the 15th. On the 5th, 4th , and 3rd strings use your pointer to play the 12th fret and your ring finger to play the 14th. On the 2nd and 1st strings use your pointer to play the 12th fret and your pinky to play the 15th. You will also be using box 2 of the E minor pentatonic scale which starts with your roots being on the 4th and 2nd strings but let’s start from the 6th string on the B3 of the scale. So 6th string 15th to 17th fret using your middle to pinky fingers, on the 5th and 4th strings play the 14th to 17th frets using your pointer to pinky. On the 3rd string play the 14th to 16th frets using your pointer to ring finger, and on the 2nd and 1st strings play the 15th to 17th frets with your pointer to ring finger.
Step 4: The Solo
Right after you hear them say, “Play some of that for Papa” the solo kicks in. Starting off all in Box 1. Pick the 12th fret to the 14th fret on the 4th string. Then the 12th fret to the 14th fret on 3rd string. The 12th fret on the 3rd string. Now bend the 15 fret up a full step on the 2nd string. Then the 12th fret 2nd string to the 15th fret on the 1st, bend this note three times, each time doing one full step bend. When you come down from the last bend you are going to pull off to the 12th fret 1st string. Then 2nd string 15th fret pull off to the 12th fret. Then you’re going to bend the 15th fret 2nd string again up a full step and then grab the 12th fret 1st string with your pointer right after, while you are still bending the 15th fret 2nd string.
Almost like a unison bend but it comes in a second after, not at the same exact time. The 12th fret 1st string, then 15th fret to 12th fret on the 2nd string. Then bend the 15th fret 2nd string again. Then while the 15th fret 2nd string is bent, take your pinky and put it on the 15th fret 1st string. Pick them individually and then again together. Now do another bend on the 15th fret 2nd string. I know this is repetitive but it sounds awesome! Then just pick the 15th fret 2nd string, then the 12th fret 2nd string, then on the 3rd string pick the 14th fret then the 12th fret, and end with a double stop on the 12th fret holding down both the 4th and 3rd strings with your pointer finger.
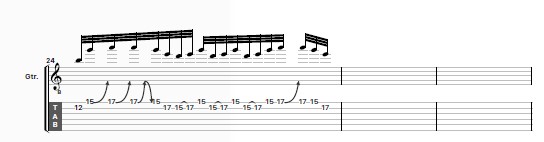
It’s kind of hard to hear what they are doing on the actual recording at this spot because it’s all a little meshed together, but what Robert does is just throws in 12th fret to 14th back to the 12th all on the 4th string. Then back to the 15th fret 2nd string for a whole step bend again, both up and down, after you bring it down pull off to the 12th fret 2nd string. Then bend the 15th fret 1st string a whole step, then up to the 17th fret 1st string and bend a full step, do this bend twice. Then back to the 15th fret 1st string, to the 17th fret 2nd string. All of this is followed by this cool little lick. Hammer-on the 15th fret to the 17th fret on the 2nd string, then pick the 15th fret 1st string. Repeat that four times and then bend the 17th fret 1st string again, then pick the 17th fret 1st string and end on the 12th fret 1st string,
For the last note you can also roll your finger up and pick the 17th fret 2nd string instead of the 12th fret 1st, but it’s a little more difficult to roll your finger, totally up to you and what is most comfortable in your opinion. And of course add some vibrato on that last note.
Recap: How to play Play That Funky Music
I hope you enjoyed learning how to play “Play That Funky Music”. What a fun song! There are tons of really cool elements to this song and a great example of a song that is so vocal. Really take that and run with it and make your guitar “sing” Be sure to play close attention to all the details, play the song slow first, then fast.