
How to Gain Finger Independence
Today Guitar Control instructor, Robert Baker, is going to give you some very valuable tips on how to gain finger independesce with a few of his very own finger independence exercieses. If you are just starting out on guitar and haven’t been playing for very long you probably noticed that your fingers seem to all want to move together at the same time. This is a very, very common hurdle that everyone has to overcome at some point, you know our fingers just don’t really want to work as their own We are used to how you normally opperate your hand, where you would maybe be grabbing something and they would be working all together. So today Robert has come up with three different examples and exercises to break you away from using your hand as a whole and get you moving those fingers as individuals now.
Step 1: Atlernate Picking
Our first of our three finger independence exercises is a very, very common one, almost every guitar player learns this at some point in their career, and it’s all going to be alternate picking. All of these are alternate picks so just know that now. That means we are switching back and forth, alternating, bewteen down and up strokes on the guitar. So picking down and picking up.
Robert starts this exercise on the 5th fret low E string, the 6th string, and chromatically places his fingers starting with his pointer on teh 5th fret 6th string, to frets 5, 6, 7, and 8. The musical term, chromatic, means right next to one another. So all on the 6th string so far starting with your pointer finger on the 5th fret, middle finger on the 6th fret, ring finger on the 7th fret, and pinky on the 8th fret. So picking down up down up, so down on the 5th fret, up on the 6th fret, down on the 7th fret, and up on the 8th fret. Then Robert just moves down a string and does the same exact thing! Pointer on the 5th string 5th fret picking down, then middle finger on the 5th string 6th fret picking up, ring finger on the 5th string 7th fret picking down, and pinky on the 5th string 8th fret picking up. Then same thing on the 4th string, fingers, frets, and picking direction, and the same on teh 3rd string, 2nd, and 1st.
If you are enjoying this lesson make sure to check out Roberts lesson on electric guitar tone tips!
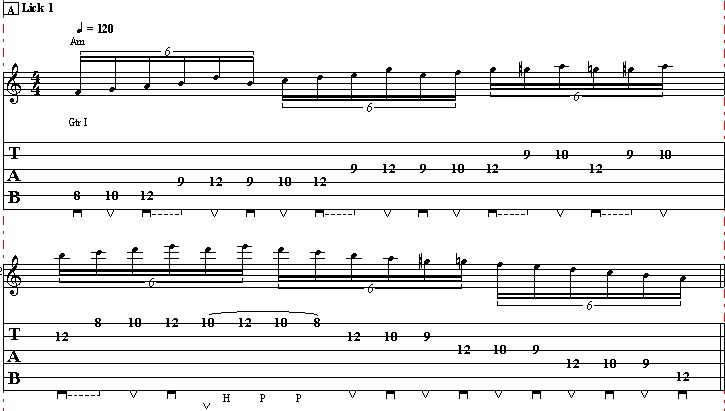
So normally what most guitar players do is after they play this example ascending up all the strings is they just descend it in the same position. Ascending means going up in pitch and descending is to go down in pitch. But what Robert is going to do is he is going to change that just a little bit. When he gets to the high E string, the 1st string, he is actually just going to move up one fret. So that means when he is descending instead of just doubling up his pinky note on the 1st string 8th fret, he is going to move his pinky up to the 9th fret 1st string and then descend from there with a downstroke and maintaining the alternate picking.
This makes his next note the 8th fret 1st string played with an upstroke with his third finger, then the next note the 7th fret played with a downstroke with his middle finger, and finishing with his pointer finger on the 6th fret 1st string, played with an upstroke which sets us up to move to the string above, the 2nd string 8th fret with a downstroke and you continue to do this on all of the other strings until you are all the way back to the 6th string 6th fret with your pointer. When you get to this note you are going to shift up a fret again so now you are ascending from the 7th fret down. So pointer now on the 7th fret 6th string with a downstroke, then middle finger on the 8th fret 6th stirng with an upstroke, ring finger on the 9th fret 6th string with a downstroke, and then pinky on the 10th fret 6th string with an upstroke. Then again doing this down all of the strings till you wind back up at the 1st string where you would shift up and keep repeating this pattern.
Step 2: Simple String Switching Exercise
This next exercise is going to be a simple two string idea but it does have us moving quite a bit through different patterns that are fingers are going to calmly fall into when we’re playing the guitar. This exercise is basically changing back and forth between two picking patterns, using two strings only. Getting us comfortable switching back and forth between different strings just cycling through the pattern.
Robert starts on the 4th string using his pointer to hold down the 5th fret 4th string, his middle finger to play the next note, the 6th fret 4th string and his pinky to grab the last note the 8th fret 4th string. Then he also picks the 5th, 6th and 8th frets on the 3rd string using the same fingers. Then he goes backwards picking the 6th fret again on the 3rd string and then the 5th fret on the 3rd string. Then back to the 4th string picking the 8th fret and holding it down with your pinky finger and then picking the 6th fret, holding it down with your middle finger. This is one time through, known as the half step whole step shape. The half steps are between the 5th and 6th strings, the frets that are right next to eachother and the whole steps are between the 6th and 8th frets, the frets that are two frets apart.
Robert is also alternate picking this exercise. Alternate picking is so useful because no matter what it is always faster because if you were to play two downstrokes in a row you would still be bringing your hand back up, just not ultizing the upstroke. When you alternate pick you ultilize everything. So remember for this example so far we only used fingers 1, 2, and 4.
For the next one we are simple changing the order of the half step whole step shape to the opposite and now playing a whole step half step shape. Starting with the pointer finger on the 5th fret 4th string, ring finger on the 7th fret 4th string, an then pinky on the 8th fret 4th string. Then doing the same thing on teh 3rd string, pointer on the 5th fret 3rd string, then moving a whole step to the 7th fret 3rd string with our ring finger, and then a half step to the 8th fret 3rd stirng with your pinky finger. Then back to the 7th fret 3rd string with your ring finger, to the 5th fret 3rd string with your pointer, back to the 4th string 8th fret with your pinky, to the 7th fret 4th string with your ring finger. This puts us in the perfect position to repeat, starting over with the 5th fret 4th string, just cycling this lick. The trick is being able to switch between both of these shapes, so being able to play each two times in a row and then switch back and forth between the two shapes.
The third shape we are going to be doing is known as the whole step wole step shape. We now are going to play the 5th fret 4th string with our pointer, then move a whole step to the 7th fret 4th string with our middle finger, not our ring finger like we did the last time we played this fret because if we use our middle finger for this note this time it gives us the extra stretch we need to now reach the 4th string 9th fret with our pinky finger. Then of course do this on the 3rd string, pointer on the 5th fret 3rd string, middle on the 7th fret 3rd string and pinky on the 9th fret 3rd string.
Even though Robert chose to use his pointer to middle for that stretch a lot of players still use their pointer to ring finger, so in this case its totally optional which you would like to do, whatever feels the most comfortable to you personally. So after you get to the 9th fret 3rd string with your pinky, go back to the 7th fret 3rd string with your ring or midde, and then back to the 5th fret 3rd string with your pointer, then back to the 4th string 9th fret with your pinky, and finally back to the 7th fret 4th string with either your middle or ring to set you back up to repeat this pattern, cycling it over and over like we did with the previous two patterns, the half step whole step pattern and the whole step half step pattern. At about 4:46 Robert is going to walk you through all three of these playing each pattern twice. The trick is the transtion between them. You want to make sure you do a very smooth transition where you do them all consecuitvely in a row.
Then we have one more. A chromatic exercise. Picking the 5th fret 4th string with your pointer, to the 6th fret 4th string with your middle finger, to the 7th fret 4th string with your ring figner and then the same thing on the 3rd string. Pointer on the 5th fret 3rd string, middle finger on the 6th fret 3rd string, and ring finger on the 7th fret 3rd string. Then back to the 6th fret 3rd string with your middle finger, to the 5th fret 3rd string with your poitner. Then back to the 4th string 7th fret with your ring finger, to the 4th string 6th fret with your middle finger and then you are all set up to start back over. At 5:34 Robert will play through all of them now.
Step 3: Walking Through Scales
Example number three is a little but more intense. We are basically walking our way through a scale now. So this is a really musical application of building finger independce. Robert is going to be using a G Major scale, a three note per string version, which means exactly what it sounds like, 3 notes or frets played per string. This form of scale is popular for soloing since it is easier to move between the strings since they all have three notes.
The reason that Robert likes this one and finds this example to be extremely useful is because it uses all of your fingers, that is why it is such a good one, and it’s an actual scale so it is very musical. You will also notice that it also uses the three main shapes that we just did in exercise number 2, minus the chromatic shape. The half step whole step, the whole step half step, the whole step whole step. Starting on teh 6th string playing frets 3, 5, and 7 and doing the same on the 5th string playing frets 3, 5, and 7 both using your pointer finger to middle to pinky. On the 4th and 3rd strings play the 4th, 5th, and 7th frets, with your pointer middle pinky and then on the 2nd and 1st string using frets 5, 7, and 8 with your pointer to ring to pinky. When descending it make sure you play the frets the exact same way but descending so just going the opposite directions. Instead of low to high, you would now be going high to low.
Recap: How to Gain Finger Independence
I hope you enjoyed Robert’s finger independence exercises! These three exercises really help gain finger indepence. Remember to practice them slowly first and to really focus on building strength and slowly building speed. Speed will come in time, but make sure you focus on playing things right as muscle memory is defintely a huge factor in guitar. And of course, as always, have fun!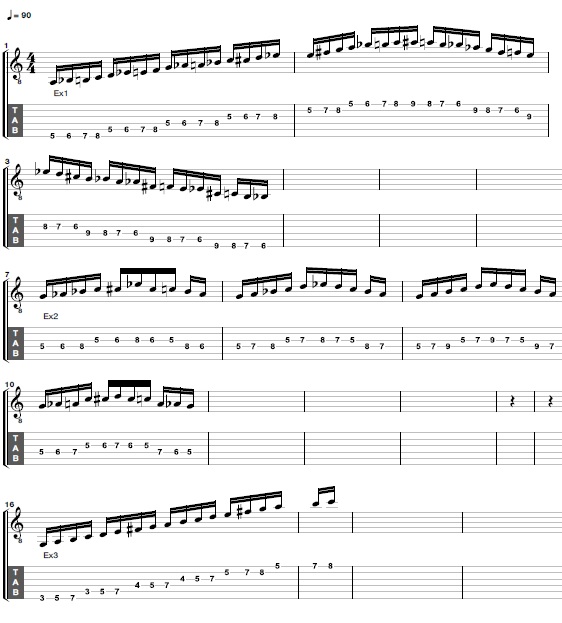
Click Here to Learn More