How to Play Highway to Hell Riff
In this “Highway to Hell” guitar lesson Guitar Control instructor Robert Baker, is going to break down all the Main Riffs and parts of this killer song. Highway to Hell is arguably one of the greatest Riffs of all time! Because this song is so awesome, Robert actually split this into two videos.
This way, one is focused on the riffs and one is focused on that awesome solo! Be sure to check out his other video, how to play “Highway to Hell Solo”, to make sure you learn that, too! Now let’s get started breaking down this awesome song.
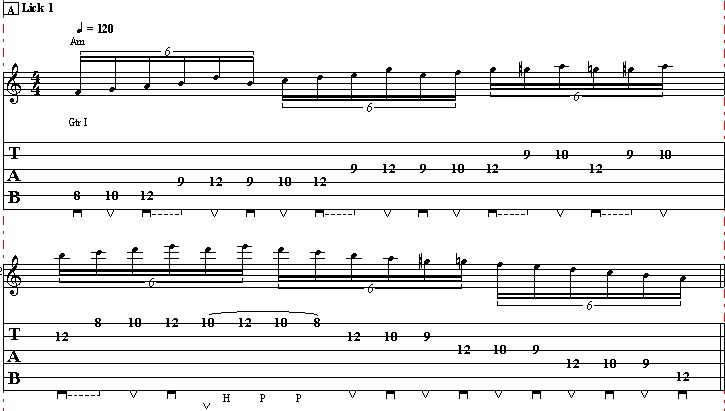
Step 1: The Main Riff
In this Highway to Hell Guitar lesson, Robert is actually going to give you a few different options on how to play this main riff. As far as strumming, Roberts hand isn’t doing much, it’s like a straight strum, so don’t worry too much about your picking. Some people like to do all downs, some people like to alternate strum, it is not really crucial to do either one way for this riff so it is totally up to you.
First off, there are a couple of different ways to play the first chord in this riff, Robert will cover both. When he’s seen Angus do it, he uses pretty interesting finger choices. All of these different ways are the same notes, but the fingers used to hold them down are different. Angus’s way isn’t necessarily the easiest. So Robert is going to show you what he does when he plays it himself, but again if you watch Angus he is using different fingers to play that chord.
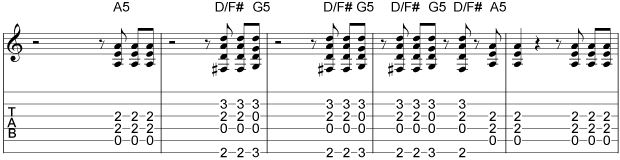
Start with an open A5 chord. In this case that simply an open 5th string with your pointer holding down the 4th and 3rd strings in the 2nd fret. Strum this chord three times. When Robert plays it he strums down up down, but again you can easily just do three downs, it’s totally up to you. Then comes the kind of tricky chord of the riff. In tabs it’s usually written D/F#. It’s basically a Dsus2 chord, which is just an open 4th string, 2nd fret 3rd strings, and 3rd fret 2nd string with an open 1st string. Robert uses his pointer finger to hold down the 2nd fret 3rd string and his ring finger to hold down the 3rd fret 2nd string. But remember there is an F# in the bass, that’s what D/F# stands for. If you said it out loud you would say, D over F# or D with an F# in the bass.
Meaning the lowest note isn’t going to be the root of the chord, making this chord and inversion. Which means the notes of the chord are played in a different order, giving it a different sound and voicing. So to get that F# in the bass, place your pointer finger on the 6th string 2nd fret. Let it kind of touch the 5th string, this will mute it which will deaden it and make it not sound out when you strum down, we want to really get to hear that F# in the bass, and even though the A note is also in this chord, having both of those lower strings ring out will make the F# not stick out as much. Then Simply pick up your pointer and middle fingers and place your middle finger on the 3rd fret 6th strings and leave your pointer off the fret board, this is basically a G chord. Robert is again keeping the A string muted. Sometimes getting rid of some of the lower, bass notes on riffs like these, with lots of distortion cleans them up and makes them more crisp sounding.
You’ll notice that AC/DC does this a lot with their riffs. So back to the F#/D, you are going to strum this chord twice and then go straight into that G. Practicing that move right there is good, just to get used to that transition. Isolating is difficult, tricky, or new chord changes is always a good idea. Robert think Angus uses his ring finger on the 3rd string 2nd fret, pinky on the 2nd and his middle to grab that F#, and for the G keeping his pinky on the 2nd string 3rd fret and then using his ring finger to reach up to the G note on the 6th string 3rd fret.
This is a really unusual way to play both of these chords, so feel free to use the standard versions that Robert showed. Both are right but using Angus’ versions don’t give you anything that the standard ones don’t, for this riff it would just be personal preference. So whatever you feel comfortable with as far as fingerings for these chords. So to quickly recap this riff, you have A5 three times, then D/F# two times, straight to G once. Then repeat only this part of the riff, the D/F# played twice to the G. You’re going to play that two times close together, then one more time straight back to the A5. That is basically the entire intro and verse for this song!
Step 2: The Pre-Chorus
Now, we have the pre-chorus that leads us into the chorus. This part can also be played a few different ways just like the first, same notes but different fingerings. Robert has seen Angus and others play it this way. Since its just an E5. Which is an open 6th string, then pointer holds down the 5th and 4th strings 2nd fret. And you just do a build up, so you hold down the chord, muting and chugging gradually getting louder really making the song sound like it’s growing and building up to something. It adds a lot of excitement, preparing to take you to the chorus. So some people play it open, but Robert has also seen people play it on the 5th string 7th fret. So an open 6th string which is an E note, pointer on the 5th string 7th fret, ring finger on the 4th string 9th fret, only strumming the 6th through 4th strings. Of course in the same style, building up and gradually getting louder. And that is the entire pre-chorus.
Step 3: The Chorus
For the actual chorus we are going to use the open A5 again. Open 5th string with your pointer holding down both the 4th and 3rd strings on the 2nd fret and strum it 4 times, strumming only the 5th through 3rd strings. Now, go to D major, earlier we played a D/F# based off the Dsus2 chord, but we didn’t play an actually D. So to play the D major, place your pointer on the 3rd string 2nd fret, your ring finger on the 2nd string 3rd fret, and your middle finger on the 1st string 2nd fret. Strum from the open 4th string down through the 1st string and strum this chord twice. Then you are going to go to a G major chord. Robert is using the same G we did earlier, and strum that once and then back to D major, the same one we just did, once then repeat!
The very last time though after the A, go to D and let it ring out. So a quick recap, it’s A, A, A, A, D, D, G, A, and on the last time, it’s just A, A, A, A, then one D, but ring it out. Then we go right back into the main riff, then there’s one little part before the solo. But all that’s really doing is playing a D major chord, sometimes Robert adds in the F# in the bass because he feels like it, kind of fills out this chord a bit.
That would mean playing the normal D major and then just like the D/F#, place a finger on the 6th string 2nd fret. In this case since he is playing the full D, you could use your thumb to grab that F# on the 6th string. Then after you strummed your D major chord, you’re going to take your pinky finger and add it to the 3rd fret 1st string, making this a Dsus4 chord. And you’re going to be bouncing back and forth between these two chords, leading you into the solo.
Recap: How to Play Highway to Hell Riff
I hope you enjoyed Robert’s “Highway to Hell Guitar Lesson”. This is just a great, iconic song with huge cool riffs and a must in any guitar player repertoire. Be sure to check out the second half of this lesson, how to play Highway to Hell solo! Pay close attention to detail, isolate any of the chord changes you need to.