Hey, how’s it going this is Darrin Goodman with Guitar Control, I want to show you an arrangement for the song called “Imagine” by John Lennon. This song is originally done on piano and this is a kind of finger style arrangement that you can use. It’s fairly easy to play in stuff and it’s a really fun song to play, sounds really cool on your acoustic or your electric guitar
[ninja-popup ID=715]
Click on the Tabs button to follow the chords and tabs.
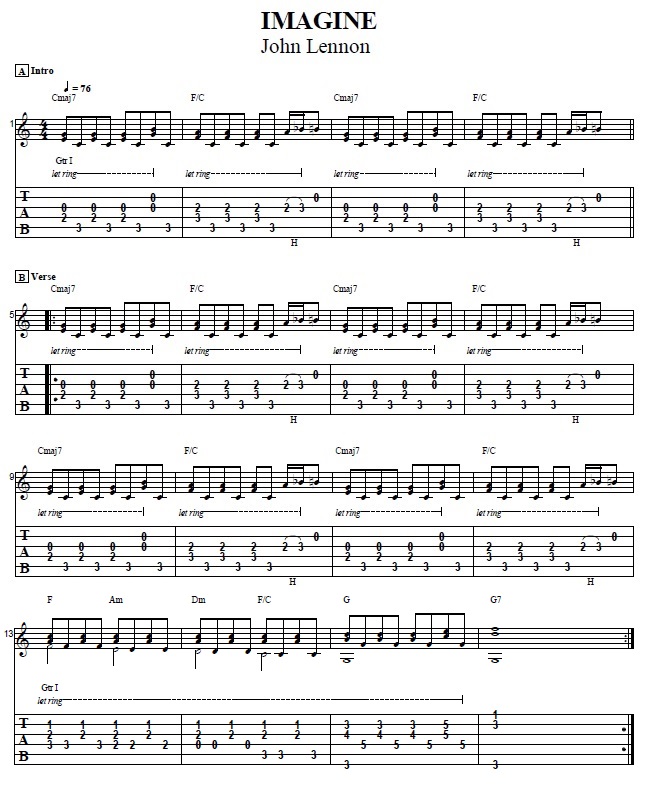
First, let’s take a look at the two chords that we’re going to be using for this Intro and it’s also the riff for the verse as well so the first chord that we have is C major seven, if you just take that regular old tried and true C chord, that I’m sure you already know, just remove your first finger that’s F major 7. I’m on the 3rd fret of the 5th string with my third finger the 2nd fret of the 4th string with my second finger and then the rest of the strings are open at C major 7 and from there we have F over C, just take the regular 1st position F chord. So I’m barring across the 1st and 2nd fret of the 1st and 2nd string with my first finger and then on the 2nd fret of the 3rd string with my third finger and then on the 3rd fret of the 5th string with my third finger and the 3rd fret of the 4th string with my fourth finger so it’s just F but it’s got the C in the bass.
Those are the two chords for this first riff that we’ll be looking at the finger style and we’ll take a closer look but for now you’ll be playing the 5th string with your thumb and then you’re going to play the 4th and 3rd string with your first and second fingers. So 1st finger plays for 3rd finger place 3. So we pluck 4 and 3 together and then follow with the bass note on the 5th string so we do that three times and then we pick up. We get the 2nd and 3rd string with our second finger and still play this 3rd string and use your third finger to play the 2nd string.
That way you don’t have to shift your hand position or you can move up and use your first and second fingers. It depends on how comfortable you are with finger picking and then you play that and follow back to the 5th string, that’s the first measure.
For the second measure we go to the F over C and we do the same strumming that we start off with. We’re hitting four and three together and fall on with the 5th string three times and then we have this this little dissonant sounding cool lick. Your second finger on the 2nd fret of the 3rd string, you can hit that and do a hammer-on to the 3rd fret with your third finger and follow that with the 2nd string open. It’s very dissonant sounding, the first two measures and that is repeated a lot. That’s like the main riff out of that whole sequence twice for the intro and then it does it another four times for the verse.
From there it goes to F, now you can use the voice that we already did in the F over C but it might be more comfortable for you just if you do the regular F. It’s the same thing as the F over C except we’re going to remove our fourth finger and then move our third finger from 5th to the 4th string. Now we have that F and we have A minor, if you’d already know A minor your first finger is already picking up that set. First fret of the 2nd string, from F you keep that finger there and roll it up not barring and then second finger 2nd fret of the 4t string, third finger 2nd fret of the 3rd string it’s A minor and then D minor we just simply move our first finger from the 2nd string to the 1st string move our second finger from the 4th string to the 3rd string and move our third finger to the 2nd string but up one fret. On the 3rd fret then goes back to the F over C again, then going to G but in this case we’re actually going to do the barre chord of G. We take our first finger, barre all the way across the 3rd fret of all 6 strings then our second finger goes to the 4th fret of the 3rd string, third finger 5th fret of the 4th string and fourth finger to the 5th fret of the 4th string and then the last chord in this section is G7.
This voicing of G7 might be a little different than what you’re used to doing but we got the 1st fret of the 1st string with your first finger then the 3rd fret of the 2nd string with your third finger and then the 3rd fret of the of the 6th string with your second finger and actually it might be easier if you use your pinky instead of your third finger, whatever is more comfortable for you is alright.
Then we go to F and we’re going to pluck strings 4, 3, and 2 simultaneously thumb on the 4th string first finger on the third and second finger on the second we pluck strings 2, 3, and 4 simultaneously and then follow that with the 4th, 3rd, and 2nd, string and then the 4th string again. Then from there to A minor so we have same picking pattern of the string so the first measure is F and A minor then the next measure is D minor. We’re still going to play on those same strings followed by F over C. Now our thumbs is going to move from 4th to the 5th string and we’re plucking just strings 2 & 3 that’s the second measure of that part which your transcription is measures 13, 14.
And on that G, we’re going to play the 6th string with your thumb and we’re playing the 2nd and 3rd strings with your third and second finger and the 4th string with your first finger. So we got 6, 3, and 2, simultaneously and then 4, 1, and 2, and 3, 4, 2, and 3, 4, 2, and 3, 4, and then that G7, and we’re going to pluck 6 with our thumb to the 2nd string with our second finger and the 1st string with our third finger all simultaneously.
On that main first riff we’re going to do the thumb on 5 and we’re going to hit 4, and 3, with our first and second fingers and then on that 3rd and 2nd string you can either use your second and third finger, so that way you don’t have to change your hand position or you can move up with your first and second finger if you haven’t had a lot of experience with finger picking that might be the way to go just simply because you’re going to have a lot more coordination, index starting with your first and second finger than you are trying to include that third finger. But I recommend to try to work on yourself up to be able to have that part so when we do that little riff using my second finger on the third string pluck hammer and then following that with the 2nd string open with my third finger. Though it moves on to the next section starting on the F again, I’m playing my second finger on the 2nd string first finger on the 3rd string and thumb on the 4th so as I move around through these chords I have to like move my thumb to get out of those correct base notes.
Make sure you have the tab so you can follow along and kind of memorize the lowest note in the chord which is the one being played with your thumb. I hope you enjoy that and you got something out of it, if you like this video make sure to subscribe on our You Tube Channel and we’ll see you in our next video lessons, thanks for watching.