
Hey, guys. Claude Johnson here with guitarcontrol.com and I
want to talk about pentatonic scale shapes and playing licks
and expanding your knowledge.
I’m in the key of A. The thing is, first of all, you’ve got
to know your five basic shapes. I’m not going to go over those
because I’ve done, I think, several videos. So you can search
my channel for five pentatonic shapes. Here’s the paradox. One
the one hand there’s just five shapes, but what you know though
is you kind of know all the patterns across the whole neck. On
the other hand, there’s always new ways to connect them. Even
after years of playing you’ll still keep discovering little
nuances and ways that they connect and seeing things deeper
and deeper.
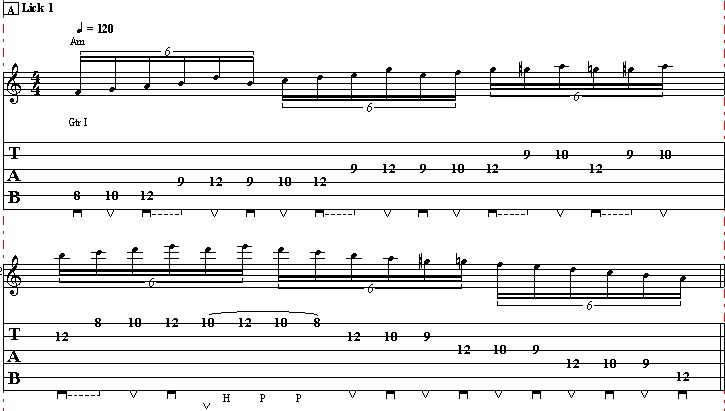
For example, normally you’d be playing two notes per string.
Two notes on that string and then two notes on the next string
and you can create your licks that way. But then you can also
slide up. Now you’re playing another note per string. So this
is a nice little way to do it. Play two notes on a string, go
up to the next string and then play three notes and you do that
with this little slide. This is on your D string, your G string,
5th fret to 7th fret and then slide that last note. There’s like
a nice little five-note pattern there. That can be a new shape
that you can experiment with and it will be a different shape
depending on where it is.
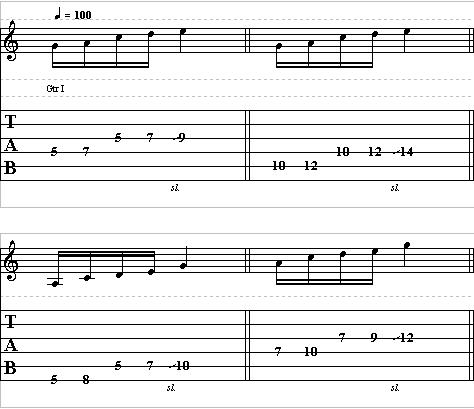
For example, this one starts on a G. You have the same shape up
here starting on a G. Or if you’re starting on the A and you go
up four notes and slide, same thing here. Now, you don’t always
have to go straight up the scale, it’s just because you know
where that note is. Like that or…
So it’s good to know where all these things are and you can
start on each note and just see what the shape is and see what
the shape is going to be at each string and then you can also
see where each of the notes are in relationship to the whole
thing. A here, you’re starting on the root position and going
up here. But if you do it way up here at the 12th fret you’d
be going from the 3rd position to the 4th position. Here,
again, you’re at this little area of the neck, connecting
this pattern with this pattern. So you can kind of see how
everything starts to tie together.
Try that. Try just playing the two notes on the one string,
three notes on the next string and that should give you some
new things to discover. I go over a lot of what I call fretboard
knowledge, understanding how the frets are laid out and how it
all connects inside “Killer Guitar Control Secrets”. So if you
want to check that out just go to guitarcontrol.com/secrets and
I’ll see you in the next video. Take care.